Installation
To use EMTL you need to
- download archive with EMTL;
- download ivutils library and put it at the same directory with EMTL;
- install FFTW (Fast Foirier Transformation) library FFTW.
To use parallel EMTL version, you need MPI. For Windows you can use MPICH2.
Installation of necessary components
FFTW
Distributive FFTW for UNIX is here. Download it (type wget with archive link location as an argument), unzip (type gunzip and tar –xvf) and install accordinginstruction here. Exactly, you should run:
./configure
make
make install
To install FFTW in chosen directory use
./configure –prefix=your_directory_nameDistributive FFTW for Windows is here. This archive contains files fftw3.h, fftw3.lib и fftw3.dll. You should put fftw3.dll in WINDOWS\system32 and use fftw3.h, fftw3.lib in your project.
MPICH2
To run parallel EMTL version on Windows you can install MPICH2 (see corresponding instructions).
Content of EMTL archive
- include - EMTL include files
- vs10/Release/libemtl.lib – MS Visual Studio 10 library, release version
- vs10/Debug/libemtl.lib – MS Visual Studio 10 library, debug version
- unix/_gcc/lib_emtl.a – g++ library
- unix/_gcc_mpi/lib_emtl.a – g++ library, MPI version
- tests - folders with some examples (scattering on sphere, etc.)
- test/test_mie - example with scattering on a sphere
- tests/_example_folder_/vs10 - project file for compilation on Windows with MS Visual Studio 10
- tests/_example_folder_/unix - makefile for compilation on UNIX
To make your own example you should start your *.cpp file with
#include "uiexp.h";
and define numerical experiment there (see Tutorial).
Use ready examples in tests as an illustration.
All necessary EMTL functions are declared in photonic/uiexp.h.
Compilation on UNIX
How to compile EMTL on UNIX
You can use ready makefile (tests/test_mie/unix/Makefile). We composed it using Paul D. Smith rules.
This Makefile compiles tests/test_mie/test_mie.cpp by default, but you can specify other file in variable SRC_MAIN. Makefile uses Makefile.arch and Makefile.target files in ivutils directory of the EMTL archive.
You should add your compiler settings to Makefile.arch, selecting some symbolic name. See examples in the Makefile.arch provided. The default symbolic name is _ARCH=gnu which binds with gcc compiler.
To compile the code for the specific configuration, change directory to tests/test_mie/unix
cd tests/test_mie/unixtype for serial version
make _ARCH=<your_archname>and for parallel version
make _ARCH=<your_archname> _MPI=true
The corresponding binary data, including executable, will be placed in the configuration-specific directory, namely _<your_archname> or _<your_archname>_mpi. The executable name is tests/test_mie/unix/_<your_archname>/test_mie.x.
Making makefile by yourselves
If you want to make your own makefile, you should:
- specify paths for header files (photonic, ivutils/include and directory where you put fftw3.h)
- link FFTW library
- use macrodefinition USE_MPI if you compile parallel version
Compilation on Windows (Visual Studio 2010)
How to compile С++ code on Windows using Visual Studio is described here.
Here we explain some basic things you should know.
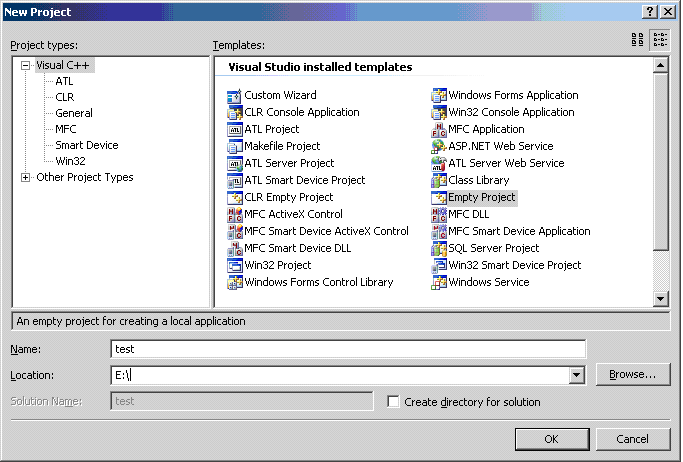
To create Visual Studio project you should open File > New > Project and choose Empty Project.
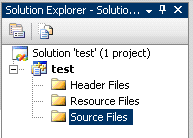
Folder that you type in Location will contain VS project files. To launch the project you should open the file with extension *.vcxproj. At the left side of the Visual Studio editor you can find Solution Explorer window
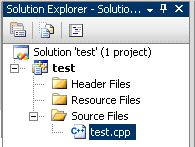
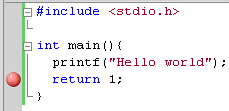
where you should add your *.cpp files. As a test you can create test.cpp file with “Hello World” C++ code:
#include <stdio.h>

int main(){
  printf("Hello world");
  return 1;
}
and add this file to your empty project. Click right button of the mouse on Source Files (or any other folder), open Add > Existing Item and choose test.cpp.
To compile the project choose Build > Build Solution. To run it choose - Debug > Start Debugging.
We recommend to specify _CRT_SECURE_NO_DEPRECATE in Configuration Properties > C/C++ > Preprocessor > Preprocessor Definitions to ignore unnecessary wornings during compilation.
Project can be compiled in two regimes: Debug and Release:
- Debug allows to execute program by steps, use breakpoiners, see and change variables values. This regime is used for testing purposes.
- Release does not have these options, but works faster. This regime is used for real calculations.
You can switch between these two regimes in Debug > Configuration Manager. Compiled binary *.exe file is stored in Debug or Release folder and can be run independently on Visual Studio in Windows command line.
For Debug regime you should choose the following options in Project > Project Properties:
- Configuration Properties > C/C++ > General. Choose Program Database (/Zi) in Debug Information Format.
- Configuration Properties > C/C++ > Optimization. Choose Disabled (/Od) in Optimization.
- Configuration Properties > Linker > Debugging. Choose Yes (/DEBUG) in Generate Debug Info.
Now you can use breakpoiners in your code
and execute it by steps (Debug > Step Over, Debug > Step Into, Debug > Step Out). In the bottom window Watch of VS redactor you can see variables values (type their names in Name and see results in Value).
You should specify the path (absolute or relative to project directory) to headers files *.h, of your code in Project > Project Properties > Configuration Properties > C/C++ > General > Additional Include Directories.
If this path includes more the one folders, they should be separated by commas.
If there are some library files *.lib to link with your code, they should be specified (separated by space) in Project > Project Properties > Configuration Properties > Linker > Input > Additional Dependencies.
Default folders for header or library files should be specified in Project > Project Properties > Configuration Properties > VC++ Directories (Include Files or Library Files).
How to compile EMTL in Windows
You can use ready project (MS VS2010 or later) file tests/test_mie/vs10/test_mie.vcxproj.
Making project by yourselves
If you want to make your EMTL project by yourselves, you should
- add *.cpp EMTL files and your *.cpp file to the project
- specify paths to photonic and ivutils/include folders in Project > Project Properties > Configuration Properties > C/C++ > General > Additional Include Directories
- specify path to fftw3.h and fftw3.lib files in Visual Studio Tools > Options > Project and Solutions > VC++ Directories (Include Files and Library Files)
- if you use MPICH2, you should specify paths 'Program Files\MPICH2\bin', 'Program Files\MPICH2\include', 'Program Files\MPICH2\lib' in in Visual Studio Tools > Options > Project and Solutions > VC++ Directories (Executable Files, Include Files and Library Files).
- specify linked library files (fftw3.lib and mpi.lib if you use MPICH2) in Project > Project Properties > Configuration Properties > Linker > Input > Additional Dependencies
- if you compile parallel version you should use macrodefinition USE_MPI in Configuration Properties > C/C++ > Preprocessor > Preprocessor Definitions
To debug parallel version on MPICH2 with Visual Studio (works only with Visual Studio Professional) you should choose MPI Cluster Debugger in Project > Project Properties > Configuration Properties > Debugging > Debugger to launch and fill following fields in the corresponding menu:
- MPIRun Command: mpiexec.exe
- MPIRun Arguments: localonly n (n – number of working threads)
- MPIRun Working Directory: $(OutDir)
- MPIShim Location: path to mpishim.exe (for example, C:/Program Files/Microsoft Visual Studio 8/Common7/IDE/Remote Debugger/x86/mpishim)


